App User
I plan to have users do the following with my app:- create a username (Start Screen)
- create classes (Start Screen)
- input students (Class Screen)
- input information about student performance (Interview Screen)
- print reports (Class Screen)
Screenshots for the Final Project app design:


User Interaction
Start Screen
 There are multiple parts to the Start Screen. Users will interact with the Start Screen by creating a username on their first time using the app. The app will store the username so that login won't be required again. Note: everything below the Confirm Username button will be hidden until the button is pressed.
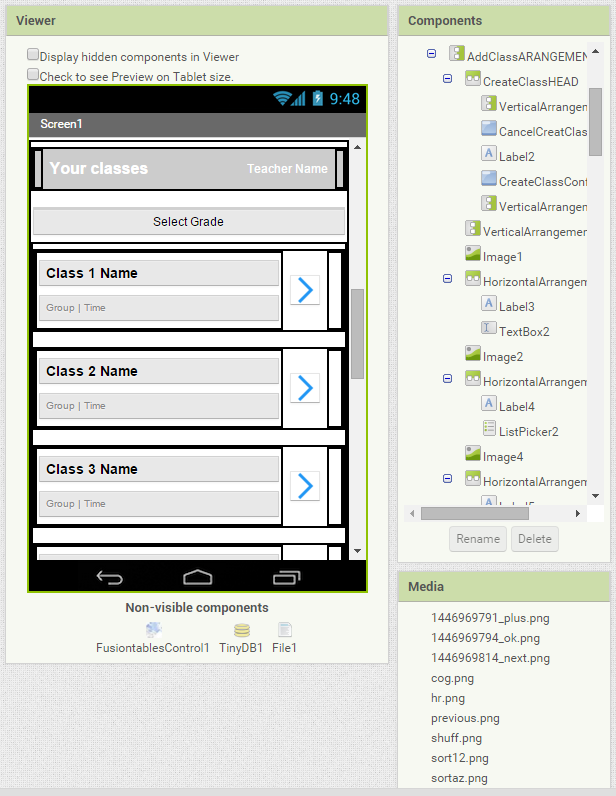
Once the Confirm Username button is pressed, the Your Classes section will appear. This section displays a Select Grade listpicker. After the user selects the grade, the appropriate classes will be shown (example text is shown in the screenshot).
 At the bottom of the class list, an Add a new class button allows users to add classes (if the user has not input any classes, this is the only thing that will be displayed in the Your classes section).
 When the user selects the Add a new class button, the appropriate section will become visible to input class information that will be added to the corresponding grade list. Note: the Your classes section will be hidden during this process.
Class Screen
 When a class is selected in the Start Screen, the Class Screen will open displaying the student information for the selected class. Information displayed will include student first name and last initial and the number of times that student has been interviewed. The user will be able to use the menu buttons to sort the list or randomly choose a student to interview. If the cog is pressed, the user will be able to edit class information (i.e. delete, add, or modify student information).
Interview Screen
 When a student is selected, the Interview Screen is opened. The user will select the Course, Stage, and Puzzle that the student is working on and will be presented with a prompt to ask. The user will then select Low, Medium, or High depending on the student's answer and the rubric level suggestions. When the user selects submit, the information will be added to the database and the user will be returned to the Class Screen.
Component Designer
I like that many features are pre-built for us: listpickers, buttons, databases... It's nice to have these components available with very little work.
However, working with the component designer for this app was extremely frustrating. First of all, since this isn't an object oriented environment, instead of defining one student information block and repeating the design with different information, I had to make 40 individual student information blocks in the Class Screen. I guess this was too much for app inventor to handle because I spent the entire week trying to work on the app but AI2 kept crashing. I tried using an offline local server version of AI2 but it wasn't that good. I ended up exporting the project, creating a fresh AI2 account and importing it to continue working. This solution enabled me to continue my work (but it brought everything to a snail's pace). I also wish I had more control over the layout. I had to use arrangements as spacers because we are not able to control the margins, positioning, or padding. I feel like I could create each screen using JavaScript, HTML, and CSS in a fraction of the time it took me using the component designer.
No comments:
Post a Comment